- None

Prerequisites:
Additional Required Hardware:
Additional Required Software:
|
|
Step 1: Install Bluetooth Adapter
Follow the directions associated with your bluetooth adapter to install it.
Step 1: Connect FT232 Serial Breakout Board to LP5DSM Transmitter
Make sure you have the TX and RX hooked up correctly, otherwise you may let out some magic smoke.
Double check this before plugging the serial breakout board into the computer or before turning
the LP5DSM on.
Step 2: Turn on LP5DSM Transmitter
Step 3: Run WiimoteDemo.bat
Go to the directory where you unzipped CopterController, and run WiimoteDemo.bat
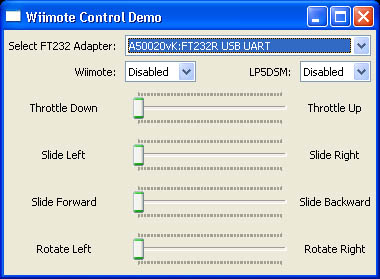
Step 4: Enable Wiimote Interface
Change "Wiimote" box from "Disabled" to "Enabled".
Step 5: Pair Wiimote
Press the "1" and "2" buttons on the Wiimote simultaneously to begin pairing.
Once pairing is successful, you should see the sliders moving in response to the wiimote.
Step 6: Hold Wiimote And Nunchuck
Tilt the Wiimote Nunchuck accessory all the way forward to bring the throttle slider to the lowest position.
Step 7: Enable LP5DSM Interface
Ensure that the throttle slider is set all the way down,
and change the "LP5DSM" box from "Disabled" to "Enabled".
Step 8: Plug In Helicopter Battery
Turn on the Blade CX2 helicopter by plugging in the battery
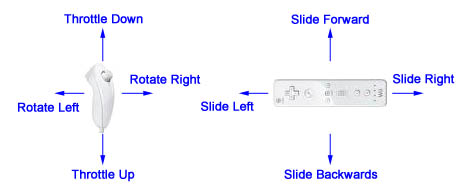
Step 9: Tilt Wiimote To Control Helicopter
The diagram below shows which side to tilt down on the Wiimote or Nunchuck in order to control
the helicopter.
Step 10: Shutdown Wiimote Demo
Once flight is complete, disable the LP5DSM interface and the Wiimote interface prior
to exiting wiimoteDemo.